技术

Nginx-Cloudflare获取访问真实IP

September 25, 2018
set_real_ip_from 103.21.244.0/22;
set_real_ip_from 103.22.200.0/22;
set_real_ip_from 103.31.4.0/22;
set_real_ip_from 104.16.0.0/12;
set_real_ip_from 108.162.192.0/18;
set_real_ip_from 131.0.72.0/22;
set_real_ip_from 141.101.64.0/18;
set_real_ip_from 162.158.0.0/15;
set_real_ip_from 172.64.0.0/13;
set_real_ip_from 173.245.48.0/20;
set_real_ip_from 188.114.96.0/20;
set_real_ip_from 190.93.240.0/20;
set_real_ip_from 197.234.240.0/22;
set_real_ip_from 198.41.128.0/17;
set_real_ip_from 2400:cb00::/32;
set_real_ip_from 2606:4700::/32;
set_real_ip_from 2803:f800::/32;
set_real_ip_from 2405:b500::/32;
set_real_ip_from 2405:8100::/32;
set_real_ip_from 2c0f:f248::/32;
set_real_ip_from 2a06:98c0::/29;

# use any of the following two
real_ip_header CF-Connecting-IP;
#real_ip_header X-Forwarded-For;

其他的连接:https://support.cloudflare.com/hc/en-us/sections/200805497-Restoring-Visitor-IPs
技术

gitlab搭建&配置&应用

September 18, 2018

本文将安装gitlab并且对其汉化和一些配置的修改。
往常一样交代下版本
gitlab:11.2.3
centos:7.5
gitlab下载

第一步安装gitlab

yum -y install policycoreutils-python
firewall-cmd --permanent --add-service=http
systemctl reload firewalld
#防火墙放行http
wget --content-disposition https://packages.gitlab.com/gitlab/gitlab-ce/packages/el/7/gitlab-ce-11.2.3-ce.0.el7.x86_64.rpm/download.rpm
#下载gitlab的rpm包
rpm -ivh gitlab-ce-11.2.3-ce.0.el7.x86_64.rpm
yum -y install git
#汉化
git clone https://gitlab.com/xhang/gitlab.git
cd gitlab
#停止
git diff v11.2.3 v11.2.3-zh  > ../v11.2.3-zh.diff
gitlab-ctl stop
patch -d /opt/gitlab/embedded/service/gitlab-rails -p1 <  ../v11.2.3-zh.diff
#这一步可能会出一些报错,直接无视就好 一路回车
gitlab-ctl start
gitlab-ctl reconfigure


第二步配置gitlab

基本配置

vi /etc/gitlab/gitlab.rb
#需要修改的行数为13,911
external_url 'http://gitlab.domain.com'   #域名,也可以写IP地址
nginx['client_max_body_size'] = '2048m'   #上传限制大小
gitlab-ctl reconfigure

邮件配置

vi /etc/gitlab/gitlab.rb
#附邮件配置,行数为53,626,627,472-480。一般服务器25端口没法用,所以建议使用465端口发
gitlab_rails['gitlab_email_from'] = "[email protected]"
user['git_user_name'] = "GitLab"
user['git_user_email'] = "[email protected]"
gitlab_rails['smtp_enable'] = true
gitlab_rails['smtp_address'] = "smtp.exmail.qq.com"
gitlab_rails['smtp_port'] = 465
gitlab_rails['smtp_user_name'] = "[email protected]"
gitlab_rails['smtp_password'] = "123456"
gitlab_rails['smtp_domain'] = "domain.com"
gitlab_rails['smtp_authentication'] = "login"
gitlab_rails['smtp_enable_starttls_auto'] = true
gitlab_rails['smtp_tls'] = true
#smtp_tls一定要注意配置,否则无法通过465端口发送邮件
gitlab-ctl reconfigure

第三步应用

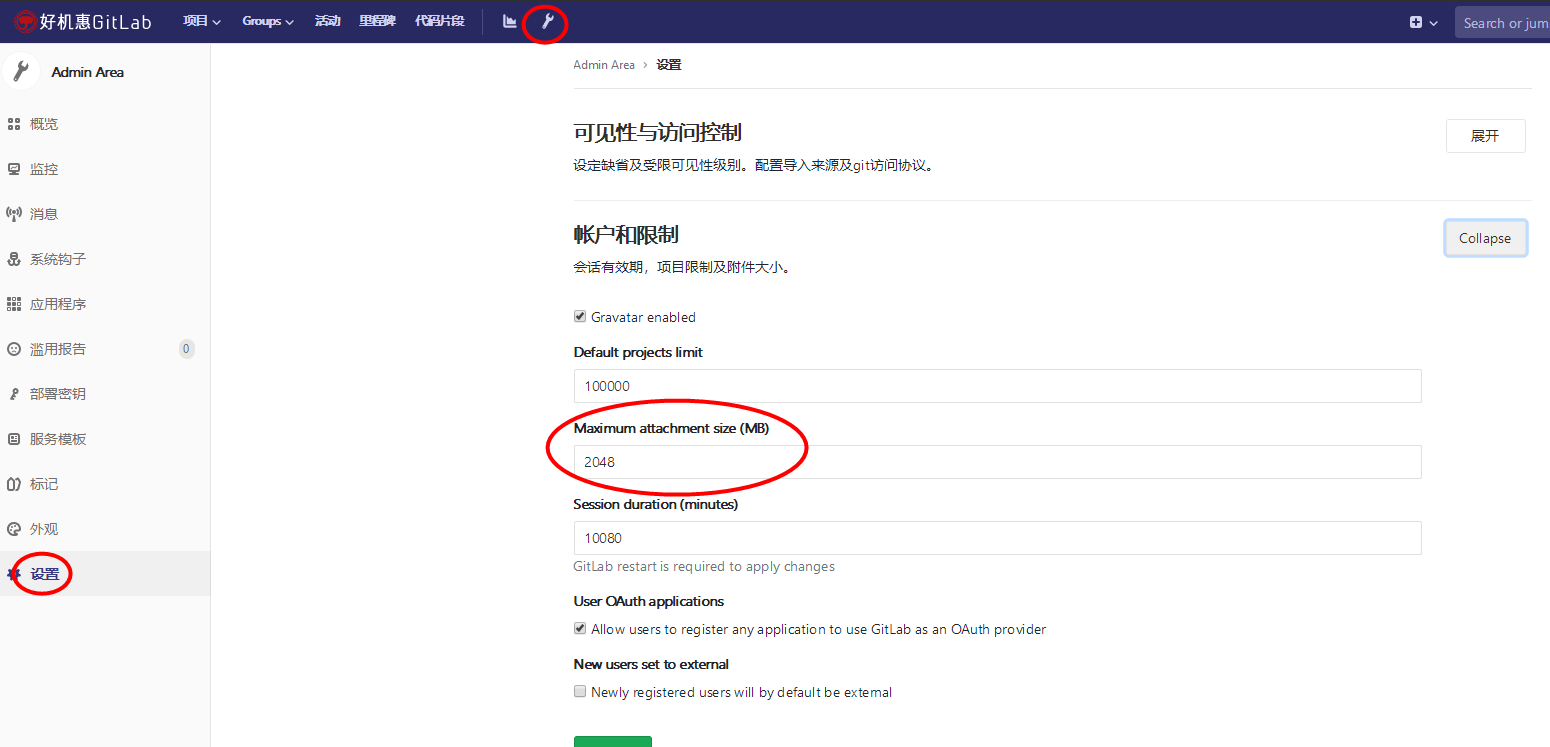
设置密码,用root用户名+你刚刚设置的密码登录gitlab
然后如图进行设置,这里设置的是上传的大小限制,建议和配置文件中的一样
t1.png

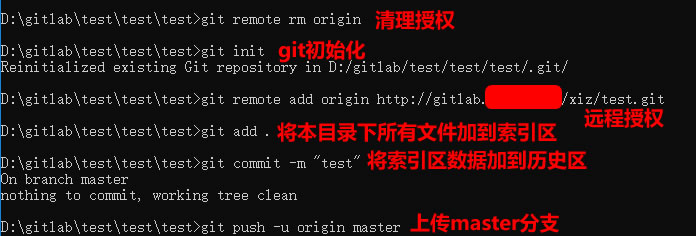
创建一个test项目,然后通过git上传,如图

git config --global user.name "Administrator"  #自己的姓名,commit代码的时候用到
git config --global user.email "mail address"   #自己的邮箱,commit代码的时候用到

t2.jpg

技术

Redis安装与配置(主从+哨兵)的脚本

August 8, 2018

Redis版本:3.0.7
Centos:7.5
一共部署3台redis,配置主从与哨兵
192.168.1.1 主
192.168.1.2 从
192.168.1.3 从

1.下载安装脚本

curl -o /root/install.sh https://www.xiz.im/github/home/redis/install.sh
#注意该脚本不能识别多个ip,如果你的服务器有多个ip,那么就自己把ipaddr那个变量写死成你要用的ip吧!

2.192.168.1.1部署master

sh install.sh master

3.192.168.1.2部署slave(从)

sh install.sh slave 192.168.1.1
#注意 这里的ip是主redis的ip

3.192.168.1.3部署slave(从)

sh install.sh slave 192.168.1.1

4.每台部署哨兵

sh install.sh sentinel 192.168.1.1
#ip为主redis的ip
#还可以选择下面的配置:
#主服务器ip地址(必填) 健康监测频率(默认30000毫秒) 故障时slave同步数(默认1) 执行超时时间(默认180000毫秒)
#sh install.sh sentinel 192.168.1.1 down:5000 syncs:2 failover:900000

然后就完成了!原创:)

查看信息

redis-cli -h 192.168.1.1 -p 6379
192.168.1.1:6379>info Replication

开启&&停止命令

service redis start
service redis stop
#推荐使用脚本重启redis,脚本会重启redis和哨兵!
sh install.sh restart